KS4 Subaru Sambar: Timing belt water pump replacement
Open the rear engine access compartment cover underneath the rear gate. It helps to press the top of the cover inwards towards the front of the truck while y0u turn the key, especially if it hasn’t been opened in a while [Image 1].
[ Image 1 ]
Loosen the lug nuts on the right rear wheel and jack up the vehicle and place the rear of the truck on jackstands securely. Remove the right rear wheel [Image 2].
[ Image 2 ]
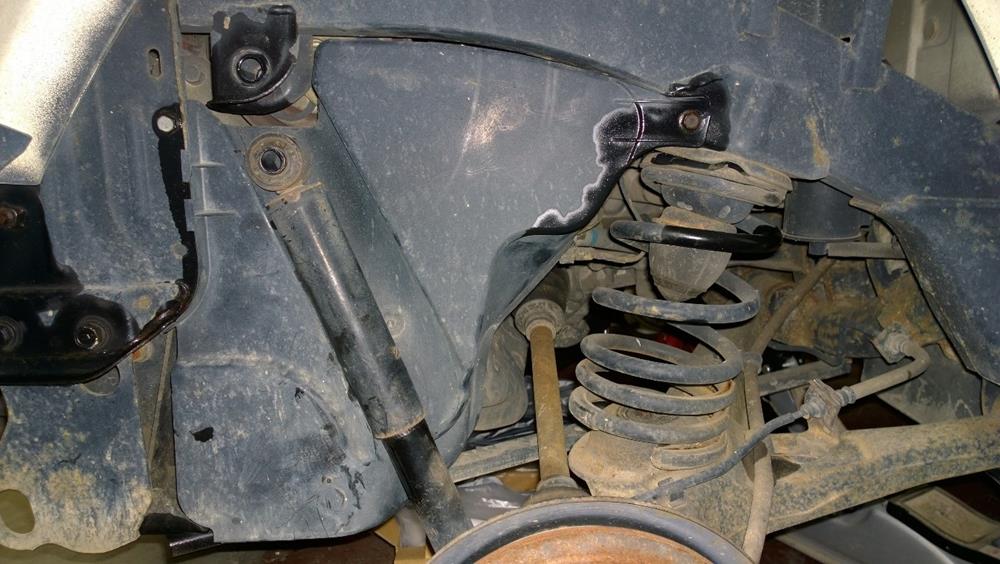
Remove the upper shock bolt in order to access the plastic cover. We sprayed the bolts with penetrating oil in order to aid bolt removal. The bottom of the cover is attached to the cross brace and it is easier to remove the cross brace as one unit with the cover by removing the two bolts that hold the cross brace to the frame [Image 3].
[ Image 3 ]
Once the cover is removed, access the crank pulley and oil filter is granted [Image 4].
[ Image 4 ]
At this point, we sprayed al the bolts we will be accessing with penetrating oil. Take care not to spray on any belts.
Loosen the two belts (if you have a Supercharged AC version) by accessing the bolt from the bed and from the side [Images 5-1 and 5-2].
[ Image 5-1 ]
[ Image 5-2 ]
Remove the belts once the tension is reduced.
Use an impact driver to remove the crank pulley bolt. If you do not have an impact driver, the left half of the timing belt cover can be removed to access the camshaft pully which can be secured in order to remove the crankshaft pulley bolt [Image 6].
[ Image 6 ]
Use a pulley remover to remove the crankshaft pulley from the crankshaft [Image 7].
[ Image 7 ]
Remove all of the bolts holding the two parts of the plastic timing belt cover. It helps to remove the bolt holding the ground wire to the valve cover and to slide out the oil dipstick tube. Only one bolt holds the dipstick tube to the timing belt cover. Both of the timing belt pulleys have a dimple on one of the teeth. Make note of the positioning of the marks before removing the tensioner (3rd picture) and remove the timing belt [Images 8-1, 8-2 and 8-3].
[ Image 8-1 ]
[ Image 8-2 ]
[ Image 8-3]
Although we’ll get to the water pump later, spray the water pump bolts with penetrating oil now.
Once the timing belt is removed, slide off the crankshaft timing belt pulley to access the crankshaft front seal [Image 9].
[ Image 9 ]
The seal can be pried out. Take care not to scratch the crankshaft or the crankcase when prying out the seal.
Old Seal VS new [Image 10].
[ Image 10 ]
Put a little grease on the new seal and press it into place. You can use the old seal, place it backwards over the new seal, and use it to help push the new seal into place. Hold the cam timing belt pulley in place and remove the three bolts holding the pulley in place. Remove the pulley and the plastic timing chain rear cover to access the camshaft oil seal [Image 11].
[ Image 11 ]
Pry out the camshaft oil seal in the same manner as the crankshaft oil seal earlier and replace. Old Seal VS new [Image 12].
[ Image 12 ]
Place a pan underneath the water pump and remove the 6 bolts securing the water pump to the engine. The four rubber pieces can that seal the water pump on the corners can be carefully pried out now. Once the bolts are removed, the water pump can be pried off. There is a dowel holding the water pump in place so it must be removed somewhat evenly [Image 13].
[ Image 13 ]
Remove the old gasket and clean up the mating surface. The instructions for the new water pump said “do not turn the water pump before installing,” and “install the water pump gasket dry”. Taking care to follow those instructions, place the gasket in the groove and install the water pump. Water pump bolt torque specs are 1.7 kgf/m [Image 14].
[ Image 14 ]
Bolt on the plastic timing belt backing cover and replace the cam pully [Image 15].
[ Image 15 ]
Replace the rubber seals on the corners of the water pump [Image 16].
[ Image 16 ]
The new timing belt has two white marks that line up with the dimples on the pulleys. Slide the crankshaft pulley back on to the crankshaft and slip the belt over the pulleys making sure to line up the white marks with the dimples [Image 17].
[ Image 17 ]
Take the spring off of the old tensioner and place it on the new one and install the tensioner. Tensioner bolt torque is 25±3 N・m [Image 18].
[ Image 18 ]
Do one last check to make sure the white lines on the timing belt is still lined up with the dimples on the pulleys and install the right-side timing belt cover. Don’t forget to reinstall the oil dipstick tube if it was removed. Before you install the left cover, secure the camshaft pulley and install the crankshaft pulley and tighten the crankshaft pulley bolt to 108±10 Nm. Install the left-side timing belt cover [Image 19].
[ Image 19 ]
Reinstall the tensioners and alternator/supercharger/ac belts. Add coolant to make up for the amount drained when the water pump was removed [Image 20] .
[ Image 20 ]
Contact Japan Car Direct today. We can help you find, purchase and import the secondhand car you seek at a reasonable price from auctions and dealers all over Japan.